*If you use this pattern, whether for personal use or to sell the product, I do please ask that you give credit where credit is due. I spend quite a bit of time coming up with my designs and patterns and would appreciate if you share the love and let them know about my business as well :) Happy crocheting! You can follow/contact me on my Facebook page and at my Etsy shop*

So today I have created a new beanie! I decided to write out the pattern and share it with you all. I added some pictures along the way to try and help if there might be any issues understanding my pattern. If you have any questions, please let me know! So far I have only tried to make this beanie in a toddler size and adult size.

Materials
* 1 skein Worsted weight yarn - I used Vanna's Choice yarn for both
* H hook
* Weeving needle
Toddler size (pictured in dusty purple)
If you don't know how to make a magic circle, making a small chain and joining would work just fine.
round 1:
rnd 2: Chain 1 (never counts as first hdc), 2hdc in each hdc around; join with sl st into first hdc (20sts)

rnd 3: Chain 1, *hdc in st, hdc around hdc just made, skip next st* repeat until end; join with sl st into first hdc

To show you how I hdc around the very first hdc, I put the needle from front to back in-between the chain 1 and the hdc. In the picture you can see that I have already YO and pulled through.
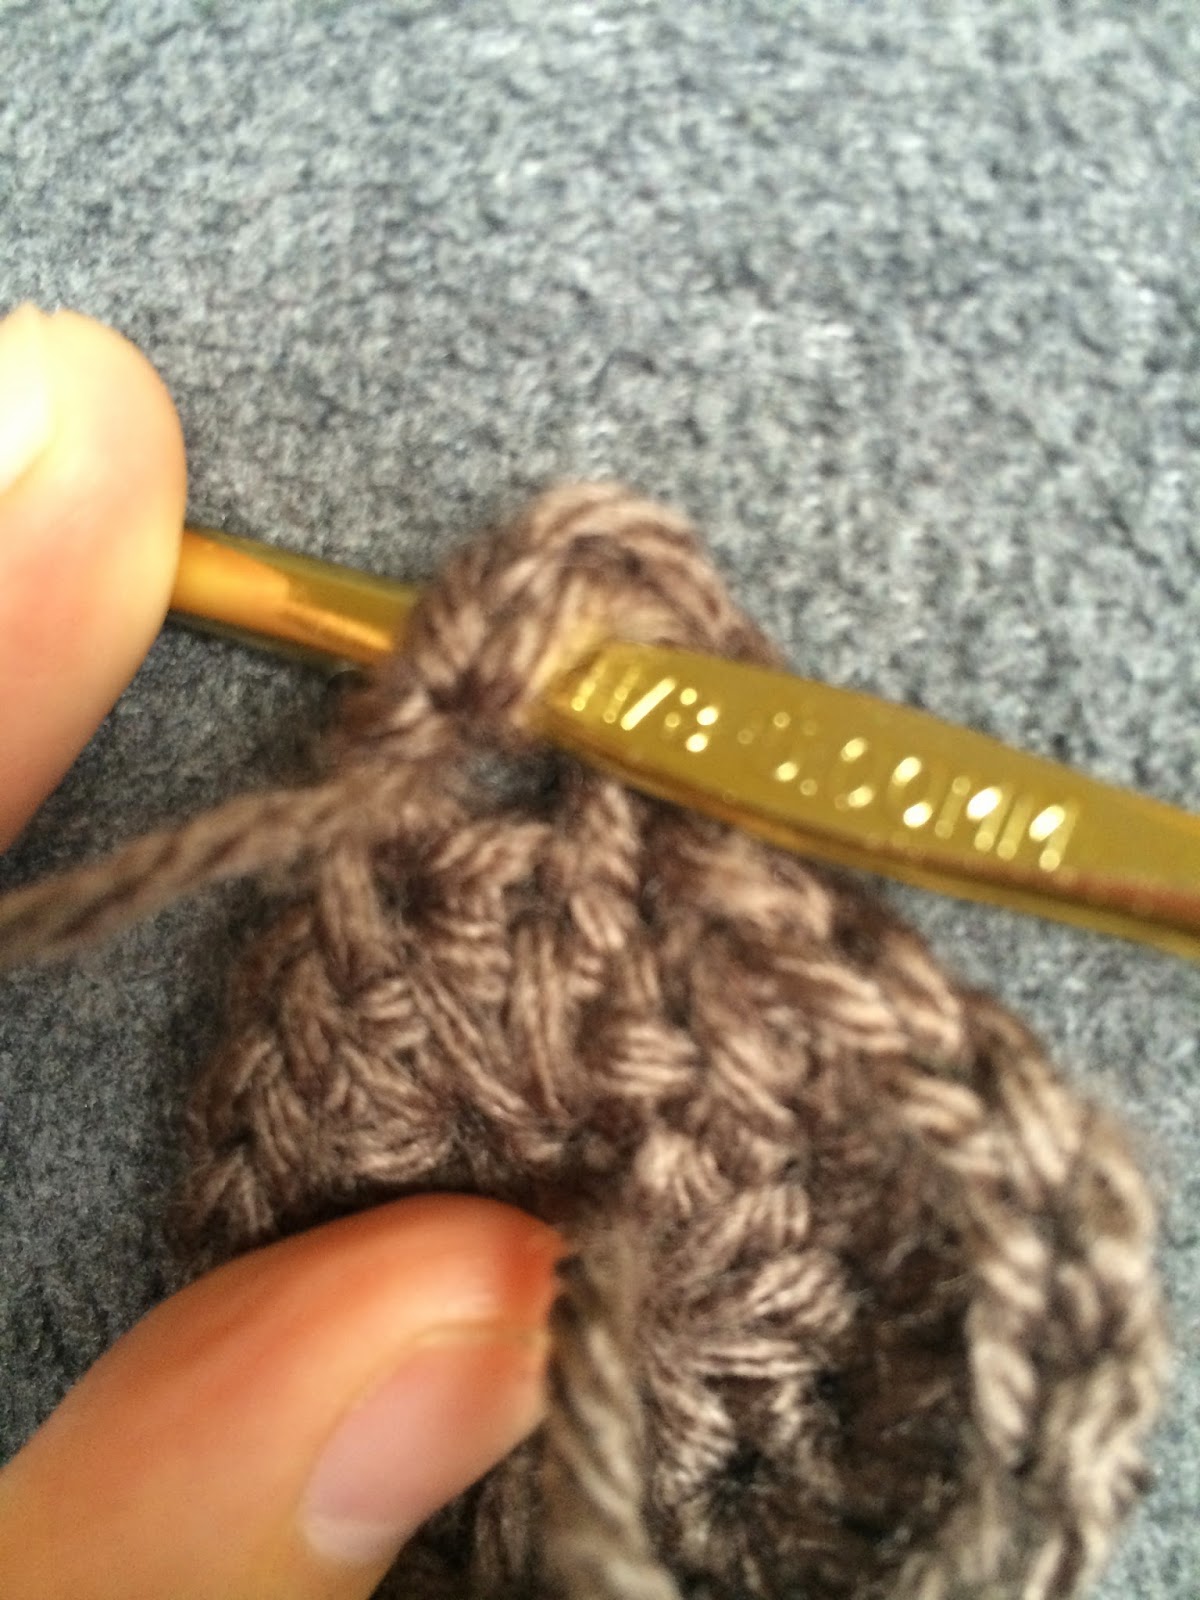
The picture above demonstrates how you want to place your hook when you hdc around the last one made.

Here is what it should look like when you hdc around an hdc.
rnd 4: Chain 1, 2hdc in each st around; join with sl st into first hdc (40sts)

I like to hdc "under" the stitch to help give it a more dramatic look and make the holes really pop. I hope this picture can help to demonstrate what I mean.
rnd 5: Chain 1, *hdc in st, hdc around hdc just made, skip next st* repeat until end; join with sl st into first hdc

You are going to notice that after these rows of hdc's around the last that it will look as if it's rolling up. Once you increase in the next row your work should flatten out again like pictured below.

rnd 6: Chain 1, *hdc in st, 2hdc in next st*; join with sl st into first hdc (60sts)

Increasing is done!
rnd 7: Chain 1, *hdc in st, hdc around hdc just made, skip next st* repeat until end; join with sl st into first hdc
rnd 8: Chain 1, hdc in each st around; join with sl st into first hdc (60sts)
Repeat rounds 7 and 8 until you have 19 rounds total
rnds 20-25: Chain 1, sc around; join with sl st into first hdc (60sts)
Finish off and weave in ends.
Finish off and weave in ends.

Adult size (pictured in taupe)
round 1: In a magic circle, chain 1, 10hdc; join with sl st into first hdc
rnd 2: Chain 1 (never counts as first hdc), 2hdc in each hdc around; join with sl st into first hdc (20sts)
rnd 3: Chain 1, *hdc in st, hdc around hdc just made, skip next st* repeat until end; join with sl st into first hdc
rnd 4: Chain 1, 2hdc in each st around; join with sl st into first hdc (40sts)
rnd 5: Chain 1, *hdc in st, hdc around hdc just made, skip next st* repeat until end; join with sl st into first hdc
rnd 6: Chain 1, *hdc in st, 2hdc in next st*; join with sl st into first hdc (60sts)
rnd 7: Chain 1, *hdc in st, hdc around hdc just made, skip next st* repeat until end; join with sl st into first hdc
rnd 8: Chain 1, *hdc in next 5sts, 2hdc in next st*; join with sl st into first hdc (70sts)

Increasing is done!
rnd 9: Chain 1, *hdc in st, hdc around hdc just made, skip next st* repeat until end; join with sl st into first hdc
rnd 10: Chain 1, hdc in each st around; join with sl st into first hdc (70sts)
Repeat rounds 9 and 10 until you have 23 rounds total
rnds 24-29: Chain 1, sc around; join with sl st into first hdc (70sts)
Finish off and weave in ends.
And there you have it! A simple beanie that doesn't take too long to make, but still super cute!
hdc around hdc - so you're essentially going back and hdc in the whole made by the previous stitch?
ReplyDeleteIt's like when you work a front post double crochet. You work the 2nd hdc around the last one like the fpdc. Hope that helps!
DeleteFrnt post DC is done in the stitch in the row below. Is that what you are doing? It sounds like you are doing a HDC and then a front post HDC around that stitch, on the same line.
DeleteRuth is right, you go around the hdc in the same row, not the one below! Sorry if I made that a little confusing
DeleteThanks for the pattern. Love it!!! I found it on Pinterest. I was looking for something to do with some yarn that I'm not particularly fond of, you know, something special that will make the yarn special. This is it <3
ReplyDeleteI will be doing the same! And from now on, some ugly yarn will have a chance to shine! Thank-you for sharing and saving yarns! loll
Deleteso you are doing a half double crochet front post?
ReplyDeleteYup, that's pretty much it! Except you do it around the previous stitch instead of the stitch in the row below it
DeleteGot it, thanks.
DeleteMy niece made this for me last night and I LOVE IT!! Thank you for the pattern!!
ReplyDeleteJust fabulous, can't wait to make them for my daughters and I. Thank you so much for sharing your design talents with us!
ReplyDeleteThis comment has been removed by the author.
ReplyDeleteI would say it is probably the yarn size you are using. I used Lion Brand Vanna's choice. I have also made it with the "I love this yarn" brand and it came out to the same size. It's the #4 weight
DeleteDo you have any videos on how to make this hat?
ReplyDeleteI don't, sorry! I don't think I would really have a way to take one either. Not sure how people do that using no hands :)
DeleteHi Rebecca! I would gladly make a video tutorial for this beanie if you want, with full links to your blog. you can email me at lovinbirth.sb.sb@gmail.com if you are interested. Thanks!
DeleteFabulous beanies
ReplyDeleteLook forward to trying your pattern. Making hats to donate and it looks appropriate for boys or girls! Thanks for sharing!
ReplyDeleteI have a question. I loved the hat. I made it and it came out very pretty except that the seam is crooked. It does not go in a straight line. What am I doing wrong? Please help. Please email me at nanapicky@aol.com, if possible. Thank you.
ReplyDeleteYou aren't doing anythinng wrong. When crocheting in a circle the seam will be slanted. I'm not Rebecca but thought I could help but I'd bet Rebecca emailed you the answer.
DeleteMake sure you are slip stitching into the first hdc of each round, not the chain st. I also put 2 hdc in the last stitch of the hdc round (70 st). My seam is now almost invisible.
DeleteLindo gorro. Obrigado por compartilhar. Beijo
ReplyDeleteLindo gorro. Obrigado por compartilhar. Beijo
ReplyDeleteGreat pattern! I made one for my niece, and have been asked to make 2 more for my sister-in-law! Thank you!
ReplyDeleteI also found that in row five it worked better for me to not skip the next stitch, just work an extra fphdc into the next stitch. My tension is very tight though, and i prefer to use a smaller hook, so that was probably the reason:)
ReplyDeleteWonderful pattern. Thank you for making it available to us. You might consider adding a print friendly button to your site so people can print out the pattern and take it with them instead of being tethered to a computer while crocheting. It can be obtained from http://www.printfriendly.com/ . Only a suggestion....no pressure :)
ReplyDeleteThank you so much for this pattern - I have been halfway done this hat for a couple months now. i agree with the above comment on the printer friendly button!! it would be a huge help.
ReplyDeleteHi
ReplyDeleteI have some cotton I think size 30 and a Steele hook size 2 do you think I Could use this pattern to make the hat for an adult please
Thanks
Renny
waaaaay too thin...at best sport weight (DK) yarn and adjust your hook accordingly and of course, always do a gauge swatch so you know where you stand the with the yarn you choose..hope this help :)
DeleteWhere do the stripes come in on this "Striped Slouchy"?
ReplyDeleteThe stripes occur as you are crocheting a 2 row pattern repeat. The stripe effect is in the pattern itself, rather than a colour change. If you wanted to change colours to make the stripes more obvious, I would do it every second row.
DeleteNot Rebecca, but I hope this helps : )
Have the hats in your picture been blocked? If so, which is the best method for blocking hats?
ReplyDeleteGreat pattern, thank you!
Have the hats in your picture been blocked? If so, which is the best method for blocking hats?
ReplyDeleteGreat pattern, thank you!
Have the hats in your picture been blocked? If so, which is the best method for blocking hats?
ReplyDeleteGreat pattern, thank you!
I have actually never blocked anything before so I couldn't tell you the best way. I just crocheted the beanie and left as is :)
DeleteHave the hats in your picture been blocked? If so, which is the best method for blocking hats?
ReplyDeleteGreat pattern, thank you!
How would you add a bill to this? Something like a newsboys hat? My son has challenged me and I am drawing a blank. Lovely pattern!
ReplyDeleteI would probably just attach the yarn to the bottom edge and do a row of single crochets until you reach the desired width. Then do a few more rows by turning back and forth and decreasing a stitch on each side of the brim.
Deleteok just to clarify in my mine...you do a hdc in the first st then go back and do a fphdc around it, then skip a stitch, do a hdc then a fphdc arount that one, repeat around row..is that correct?
ReplyDeleteREbecca, I did get it so I was able to make the hat. It's awesome! You are so creative. How did you ever think up this pattern. I've never seen another that had post stitches around a previous stitch in the same row. It sure makes a beautiful hat! Thank you for posting it and for making it free. I do have to say that I'd bet there are plenty of ppl out there that would gladly pay you for this pattern
ReplyDeleteThank you so much! I'm sorry I didn't get back to you in time, but glad you were able to figure it out. Thank you for the compliments!
DeleteSomehow for the 6 row where I would be having 60 hdc, I'm getting about 10 more. I can't figure out what im doing wrong but everything else looks right and I counted the previous stitches to be 20 and 40 in the other rows.
ReplyDeleteHmm.... it's hard to tell without seeing what you are doing. Especially if you had 40sts on the previous row, it should come out to 60sts
DeleteHow many yards do I need for this pattern?
ReplyDeleteI couldn't tell you exactly. But I used a skein of Vanna's Choice and still had yarn left over. Each skein has 170 yds if that helps!
ReplyDeleteI love the pattern. I'm a new crocheter but I will try it. I'm the kind of persistent one and don't mind unraveling, haha
ReplyDeleteQuestion for you: is there a printable version of your pattern? I can't always have computer handy.
Thank you so much, M.
I work in a yarn shop. May I use this pattern for a class?
ReplyDeleteOf course! That's awesome, thank you for that
DeleteSo cute and Quick too! I am someone who wants to start and finish a whole project like, NOW, so this is perfect! I think I want to make a cowl to match using your brilliant wrapping HDC idea! How did you even come up with that! It always amazing to me that people can come up with things like this, my brain just doesn't work that way! Beautiful job! Thank you for sharing this with us all! ��
ReplyDeleteI am enjoying the pattern but mine does not look like yours. I am on rnd8 of the adult and mine is all wavy and curled, not flat. I am hoping the more rounds I do it will work out. Thanks for the pattern.
ReplyDeleteI really like your pattern. I am making childrens hats for a fund raiser and would like to use this pattern. Do you mind as long as I give you credit? I am not very good at adjusting patterns and am wondering if you have written the pattern for sizes from new born and up. Many thanks.
ReplyDeleteYes that would be fine! What a great idea :) I have not made it in smaller sizes, but I should really try that so I can share with everyone!
DeleteGreat pattern, thank you :-)
ReplyDeleteThis comment has been removed by the author.
ReplyDeleteI just finished making this for my 15 yr old granddaughter in black. I would post a picture, but the stitches don't show up in black. I want to use this stitch pattern for a blanket and would like to have a printable version as I crochet when on road trips. It's easier to have a paper copy than to refer to IPad or other device. Is a printed version available? Linda Brown
ReplyDeleteI have not added a PDF pattern for this one yet. I don't have internet just yet, but I will try to work on that next week when I get it again!
DeleteI keep ending up with 40 stitches once I do the first row of hdc around the hdc, but it says I double it the next row and that should be 40-but that’ll make it 80??
ReplyDeleteAre you skipping the next stitch?
DeleteI'm just learning to read patterns and once I figured out the around the hdc part it was easy to do and came out like something more difficult. I really love this hat!! Great job!! -KristenYork
ReplyDeleteYour patterns are so easy to understand... for me.. lol. Do you have a pattern for the Messy Bun or Ponytail Hat ?? The ones I've found on Pinterest are too hard for beginners, like myself.
ReplyDeleteI jsut made this hat today and it's really cute and easy. Great directions! Thanks
ReplyDeleteWhat a fun and quick pattern this was! I made this and added a small visor on it. Just love it and it moves along so quickly! Your directions were so easy to follow! Thanks!!
ReplyDeleteLovely pattern & i have created a few for Christmas presents for friends this year :)
ReplyDeleteHi , my question is when I get to Round 5 it get 80 stitches not 60. Everything prior to that row is as per your instructions.
ReplyDeleteAm I doing something wrong? I have FROGGED it three times on that row and still get 80.
I meant round 6
DeleteHi, any idea how to knit this ???
ReplyDeleteHi - I made this for a friend - changed stitch count - only had DK and a 5mm hook, plus I put a frontpost/backpost brim - came out soooo nice. Tx for the wonderful pattern
ReplyDeleteI stopped increasing at row 6 and continued with the pattern to finish. Otherwise, it would have been too large for a 20 inch circumference head.
ReplyDeleteHello, this weekend is good in support of me, since this point in time i am reading this great educational post here at my residence.
ReplyDeleteYes! Finally someone writes about %keyword1%.
ReplyDeletePlease let me know if you're looking for a author for your weblog. You have some really good articles and I believe I would be a good asset. If you ever want to take some of the load off, I'd absolutely love to write some articles for your blog in exchange for a link back to mine. Please send me an email if interested. Regards!
ReplyDeletehello I have a question. I use a 4mm (G) hook and thinner yarn. can you tell me the cross sectional area. because I think i need to crochet more rounds (head measurement: 55cm = )
ReplyDeletehope you can give me an answer. Greetings from Venlo(the Netherlands)